Yule goats (Julegeiter)

Roll out as regular rolls, a little more oblong, then make a cut in each end

This is a local type of sweet rolls associated with the yule season. I don’t know how common it is outside the city boundaries, I have grown up with it living in a small town across the fjord, but many of the people I’ve met living in the outskirts of the city have never heard of it. It could also be decreasing in popularity, or the younger generations are less fond of it than their parents and grandparents. I have often been met with questioning faces when asking for it in the local supermarkets, but they usually sell the rolls in every one of them.

Dette er en lokal bollelignende gjærbakst som vi spiser til jul. Jeg vet ikke hvor vanlig den er utenfor byens grenser, jeg har vokst opp med dem i en liten by over fjorden for Stavanger. Mange jeg treffer fra utkanten av Stavanger har aldri hørt om dem. Kanskje er de ikke like populære som de en gang var, eller så er den yngre generasjonen ikke like glad i dem som sine foreldre og besteforeldre. Jeg har ofte blitt møtt med spørsmålstegn av ansikter i butikkene her, men likevel ser det ut som de fleste dagligvarebutikker selger dem til jul.


I don’t know what gives these rolls their peculiar name, yule goats, but one theory is the cut end of them resembling the hoof of a goat. The only thing that makes these rolls different to regular sweet rolls is the rye flour and the syrup.

Jeg vet ikke grunnen til det noe spesielle navnet, men en teori er at kutten i endene ligner på en geits hov. Ellers er den kun sirupen og rugmelet som gjør disse bollene annerledes fra vanlige boller.

Mother demonstrating the correct technique for rolling out the rolls


The how-to of the dough is the same as here, except the syrup which is added with the liquid.

Tilberedning av deigen er lik som den her, bortsett fra sirupen, som enkelt tilsettes væska i begynnelsen.

5-6 dl of milk

A bit of yeast, amount depending on how much time you have to let it rise

4-5 tablespoons of syrup

About 650 grams of wheat flour

200 grams of rye flour

5-6 dl melk

4-5 ss sirup

Litt gjær, mengden avhenger av hvor lang tid du har til heving

Ca 650 g hvetemel

200 g fint rugmel

100 g smør

Cook at about 225 degrees until tanned. Eat with brown goat cheese for ultimate Norwegian experience.

Stek på 225 grader til de er blitt gyldenbrune. Spises med brunost og godt smør.

Snow day

We woke up yesterday to two centimetres of snow. We rarely have snow here so I appreciate every little centimetre we get. Last year was an exception though, The snow came just before yule and didn’t melt until late January (or was it even later?). It didn’t snow much, it snowed once or twice, but the temperature stayed low.

Vi våknet i går til hele to centimeter med snø. Det snør så sjelden her at jeg setter pris på hver minste  snøfnugg som legger seg. I fjor var jo et unntak, som de fleste av dere sikkert kjenner til, hvor snøen kom før jul og lå til langt uti januar (eller var det enda lengre?) Det snødde jo ikke mye allikevel, men kulden gjorde at når den først kom ble den liggende leeeenge.


But back to the present, or, it is already in the past, as we woke up to bare fields and streets again today. Luckily we had a good time outside yesterday. Today we’re baking and going to IKEA (I know, no need for the facepalm. It’s Sunday and it will be crowded, but we need lightbulbs.) I’ll come back with details on what we’re baking some other day.

Men tilbake til nåtida, eller, det er jo allerede fortid, vi våknet til bare marker og veier igjen i dag. Heldigvis fikk vi kost oss ute i snøen i går. I dag skal vi bake og en tur på IKEA (jeg vet, idioti  å gå der på en søndag, men vi trenger lyspærer) Jeg kommer tilbake med detaljer om bakingen en annen dag.


Enjoy a lazy Sunday. Sundays are for procrastinating and chillaxing. I’ve done both the past days and have a few things to catch up on today. Anyway, enjoy the last bit of the weekend.

Jeg håper du nyter en lat søndag i dag. Søndagen er dagen til å utsette og slappe av. Jeg har gjort begge deler selv i det siste, og har en del ting å gjøre i dag. Håper ikke du følger i mitt eksempel. Uansett, nyt dagen og siste biten av helg, og husk, alt kan utsettes til i morgen 😉

Apple cake

We had some surprise visitors yesterday. I didn’t have much to offer, so while the boys talked computers and watched the kids, Silje and I put together a cake. I thought I’d share the recipe with you. It’s very easy and doesn’t take much more than 30 mins.

Vi fikk nokså overraskende besøk i går og vi hadde lite å tilby, så mens mannfolka snakket om dataer, powertools og diverse annet, heiv Silje og jeg sammen en kake. Jeg tenkte jeg skulle dele oppskrifta med dere, den er veldig enkel og er ferdig på nesten 30min.

Start of slicing peeling and slicing some apples. I used 3 altogether. Dice a bit more than one and half of the apples and set to boil in a pot. Add a few tablespoons of water or juice.

Skrell og del  3 epler i båter. Kutt nesten to av dem i biter og ha i en gryte med et par spiseskjeer vann eller juice. Ha lokket på og la eplene koke.

Whisk together 125 grams of sugar and two eggs until white. Gently stir in about 100 grams of flour, 1 teaspoon of baking powder and one teaspoon of vanilla sugar. Melt and add 100 grams of butter, and there is the dough.

Pisk 120gram sukker og to egg til eggedosis. Forsiktig vend inn 100gram mel, en teskje bakepulver og en teskje vaniljesukker. (oi, ble nesten en orddeling der, men hadde ikke gjort så mye, vanilje sukker ofte…) Smelt og ha i 100gram smør.


Now, back to the apples, these should be boiled tender by now, you can either mash them or use them as is.

Så, tilbake til eplene, disse burde være møre nå, så du kan enten mose dem eller bruke dem som de er.

Butter a cake form and sprinkle it with flour. Add a layer of the dough, then the apples you boiled and another layer of the dough. Decorate the cake with sliced apples and sprinkle with cinnamon and sugar.

Smør en kakeform og dryss på mel. Legg et lag med røre i bånn, så eplene du kokte, deretter et lag til med røre. De resterende eplebåtene skjærer du i tynne skiver og bruker til å dekorere kaka. Strø på kanel og perlesukker.


Cook for about 30 mins at 200 degrees and serve warm with ice-cream. Yum!

Stek på 200 grader i omtrent 30 minutt. Server varm med vaniljeis. Nam!

My Favourite Chocolate Cake

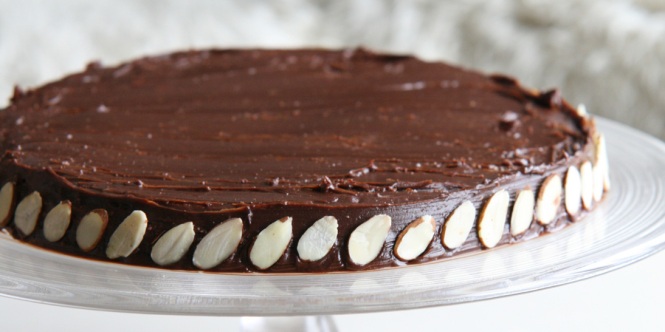
This image is from Klikk.no

This image is from Klikk.no

We have celebrated father’s day today. We started the day by letting Husband sleep in, Son and I woke him up at ten. He received his breakfast in bed. As he got up Son and I baked the best chocolate cake ever. Then we travelled across the fjord to my parents where we spent the rest of the day.

I dag har vi feiret farsdagen. Vi begynte med å vekke Mannen, etter at han hadde fått sovet helt til klokka ti, med frokost på senga. Mens han gjorde seg klar bakte vi verdens beste sjokoladekake før vi dro over fjorden til familien min hvor vi tilbrakte resten av dagen.


Son had a blast, playing with my brother, his girlfriend, my parents and my grandmother, my father’s mother. I think everybody’s happy about the day. But, back to the cake. I was considering keeping this one a secret, try to make it a “family secret”, but I found it online, it’s already out there. And; it’s too good not to share!

Sønn har hatt en fantastisk dag, han har lekt med min bror, hans kjæreste, mine foreldre og min farmor. Jeg tror alle er fornøyd med dagen. Men tilbake til kaka. Jeg lurte på om jeg burde prøve å holde denne oppskrifta en familiehemmelighet, men jeg fant den online så den er jo fremdeles publisert og lett å finne. Den er også for god til å holde for seg selv.

You need:

2 tablespoons coffee (cognac or rum will also do)

120 grams chocolate

100 grams butter

3 eggwhites

3 eggyolks

1 tablespoon sugar

A pinch of salt

50 grams ground almonds

50 grams flours

Icing:

100 grams chocolate

5 tablespoons of butter

2 tablespoon of coffe (or rum or cognac)

Almond flakes for decorations


Du trenger:

2 ss kaffe (rom eller konjakk)

120 g sjokolade

100 g smør

100 g sukker

3 stk eggeplomme

3 stk eggehviter

1 ss sukker

1 klype salt

50 g malte mandler (du kan male dem med en stavmikser ellerkjøkkenmaskin)

50 g mel

Glasur:

100 g sjokolade

5 ss smør

2 ss kaffe (rom eller konjakk)

mandelflak (mandelskiver) til pynt

First whisk butter and sugar to a white creamy consistency, butter needs to be at room temperature. Melt the chocolate with the coffee (or alcohol if you prefer). Grind the almonds and stir the yolks. Add it all together.

Visp romtemperert smør og sukker sammen til en kremete konsistens. Smelt sjokoladen sammen med kaffien. Mal mandlene. Rør eggeplommene godt sammen. Bland det sammen.

Whip the egg whites, sugar and salt until it’s fluffy and white.

Visp eggehviter, sukker og salt sammen til hvit krem.


Cook for 22 mins at 175 degrees.

Stek på 175 grader I 22 minutt.


Simply melt the chocolate, butter and coffee, let both it and the cake cool and spread on the cake. Decorate the side of the cake with the almond flakes. Enjoy!


Smelt sjokolade, smør og kaffe, la glasuren og kaka avkjøle og smør det på. Pynt langs kanten med mandelflak. Nyt!


Norwegian Cuisine, skolebolle, sweet rolls with custard

Sweet rolls á la Norway

I thought I’d share some traditional Norwegian food with you. Don’t be fooled by the title, this is not fancy cuisine, but food that, I believe, every Norwegian has tasted at least once. The first one up is skolebolle. It translates directly to school bun/roll. Where my husband is from they call it Porke, which sounds very funny to me, as purke is a female pig, and there is only a small difference in pronunciation of the two. Anyway, it is worth trying.

Start out with a sweet dough. What I used today was:

(I followed a recipe I found here, and also the tips and tricks from this post. I was left with the softest and easiest dough ever! Absolutely worth a try)

900-1000 grams of flour

1 egg 5 dl milk

25 grams fresh yeast

2 tablespoons of cardamom

150 grams sugar

150 grams butter

You could just mix all this together, but for a better result: Measure up enough butter, dice it and leave on the side. Mix everything together except for the butter and let a machine (or if your’re feeling a little evil; a person) knead it for about 10 minutes. Add the diced butter, one piece at the time. I would recommend leaving this job for a young child, as they will probably enjoy it a lot more than you do (speaking from experience here). Then knead the dough until the butter is absorbed by the rest. Cover the bowl with plastic (as that keeps the moisture in) and leave to rise somewhere warm for a few hours.

After a few hours you’re (most likely) left with a wonderful dough to work with. Cut into about 30 pieces and roll into balls. Dig a hole in the middle of the balls and fill with custard, then cover it again with plastic and leave to rise for a while. (Preferably until they have doubled in size.)

Preheat oven to 220 degrees and bake for 10-15 minutes (time depends a lot on your oven, so don’t leave for ten minutes)

Let the rolls cool before you cover them with icing (icing sugar and water) and dip them in grated coconut. Enjoy!

Project Bread, part 3

I am not too pleased with the results I have got this far, and thus decided now to go for a recipe I came across in one of my favourite blogs, Trines Mektige Matblogg. I didn’t have exactly what the recipe asked for, so here is my version:


9 dl of water

15 grams of fresh yeast

750 grams of flour

150 grams of rye

250 grams of whole grain wheat

300 grams oat meal

A wee bit sal

A tablespoon of honey

Bake at 225 for about 30 mins (recipe said 35-45, but mine would have been coal by then..)

I got three really good breads, I have yet to see what they will be like tomorrow, but hopefully they’ll be almost as good as they were today.


Project bread, part 2

I whisked together two bread here the other day, with a better result than last time. Unfortunately it was all done in a hurry (if you can call it a hurry when the dough was left to rise for almost 8 hours…) so I don’t have any photos.

I used the same recipe, same procedures, but added 2 dl of apple juice to make the dough more moist. Afterwards I set it to rise in the kitchen with an average to warm room temperature and left it for eight hours. I managed to screw up a bit, as I put the bread pans in a plastic bag. I didn’t sprinkle the dough with enough flour, so the dough stuck to the plastic and as I removed the bag I punctured the dough. The breads could have been oh so much better, so I’ll just have to try the same again, without rising them in a plastic bag. (the plastic bag is to keep the moisture in the dough and have as little as possible evaporate).


Banana Cake

I had a few bananas on the counter that was close to be tossed out. I found a recipe for banana cake and decided to put the bananas to better use.

Start with 100 grams of room tempered butter

Add 1 dl of sugar (I used fructose instead of regular sugar). Whisk it until it’s fluffy and nearly white. 

Mix in two eggsMash 2-3 bananas

Add 1 teaspoon of baking powder, 1 teaspoon of vanilla sugar and 2 dl of wheat flourThen add about 1 dl of dried fruits or berries and 1 dl of nuts.

I made this for serve when a friend came over, she has a son of the same age as Son, and as two one year olds would eat this I left out the nuts.

I baked bread the same day and was out of bread pans, so I fitted a milk carton to serve as a pan instead. If you do the same, remember to remove all plastic parts!

The recipe said to bake the cake at 175 degrees for 40 mins. I left mine in for a bit more than an hour, and it still was not completely done, so I would recommend leaving it in a little longer, and maybe also turn the heat up a bit

I think the cake would be perfect had I added the nuts and some dark chocolate.


Project: Bread, part 1

Part 1: No great success

I want to start baking our own breads. I don’t eat much bead myself but both Son and Husband do. My project now is to find a recipe that they both like. The bread has to be easily made, and be just as good and not crumble after it has been frozen for a few days. I want to use as little yeast as possible and as much whole grain flour as possible.

The recipe I used:

2,5 dl water

12 grams of yeast

3 dl of yoghurt and sour cream

1 tablespoon of honey

about 0,5 dl canola oil

3 dl white spelt flour

2 dl durum flour

4 dl white wheat flour

2,5 dl oatmeal

1,5 dl barley flour

2,5 dl whole grain wheat

2,5 dl whole grain spelt

and a symbolic amount of salt

I started with about 12 grams of fresh yeast and mixed it with cold water. Fingers needed to get dirty here in order to dissolve it completely.

I used left overs of yoghurt and sour cream…

And a mix of the different flours I had in stock.

I let Kenwood knead it for a while

Then I let Son knead 

Put the dough in two pans. Son was a great help here too

Then I set it in a cold place for about 20 hours to rise

And baked it for 35 mins at 200 degrees.

I am happy with the taste of the bread, but it didn’t rise as much as I had hoped it will. Now, I know I have readers out there who have a lot more experience than me when it comes to bread. So what should I do to improve for next time? Sourdough base? Can I let it rise for another day or so? Any tips or tricks here will be highly appreciated!

Sunday morning

I’m up and I have the house all to myself. No one knows for how long, but I enjoy every minute of it. It’s one of those moments that are rare in this household. Son was allowed to stay up a little longer last night, it being saturday and all, and has obviously decided to sleep a little longer today. I woke up  at 7.30, which I never do, Son is always up first to wake me up, usually before 7.30. I checked the time when I first opened my eyes and knew that if I fell asleep again, he would wake me up sometime during the first hour of sleep and I’d be tired for the entire morning. So I got up instead. Went to get two breads that I baked yesterday morning and now have them in the oven. Son will thus wake to the smell of freshly baked bread and also have that for breakfast. How’s that for a sunday morning?

I’ll get back to you on the breads later today, but for now I will sit back, savour the lovely smell spreading in the house and enjoy my huge cup of tea.

The image is from here: Morning photo